


Hey everyone, it’s been a while! Today, I wanna share my little adventure with summer gel nails. I’ve always been a bit jealous of those folks with perfect, shiny nails, and I figured, why not give it a shot myself? Salons are great and all, but they can be a real wallet-drainer, you know?

So, I decided to take the plunge and try doing gel nails at home. I did some digging online – watched a bunch of videos, read some articles – and felt pretty confident I could handle it. Plus, the idea of saving a ton of money in the long run was super appealing. I mean, we’re talking about potentially saving over $800 a year! That’s a lot of extra cash for other fun stuff.
Getting Started
First things first, I needed some supplies. I ordered a gel nail kit online that came with everything: a UV lamp, base coat, top coat, a few colors, and some tools. It wasn’t dirt cheap, but definitely way less than what I’d spend at a salon over time.
- Prep Time: I started by giving myself a mini-manicure. I trimmed my nails, pushed back my cuticles (this was a bit tricky, not gonna lie), and filed my nails into a nice, rounded shape. This part felt pretty familiar since I usually do my own regular manicures.
Applying the Gel
- Base Coat: Next up was the base coat. I applied a thin layer to each nail and then cured them under the UV lamp. The lamp came with a timer, so that part was easy. I just followed the instructions that came with the kit.
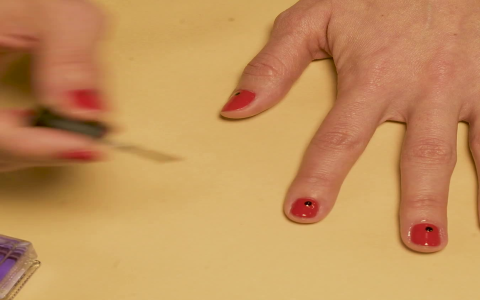
- Color Time: Now for the fun part – the color! I picked out a bright, summery pink that I was super excited about. I applied two thin coats, curing each coat under the lamp. I was already starting to feel like a pro, even though I was slightly terrified of messing up.
- Top Coat: Finally, I applied the top coat, which is supposed to seal everything in and give it that glossy finish. Another round under the lamp, and I was almost done.
The Results
Honestly, I was pretty impressed with myself! My nails looked surprisingly good. They were shiny, smooth, and the color was vibrant. Of course, they weren’t perfect – I had a few smudges and bubbles here and there, but overall, I was thrilled.
It definitely took some time and patience. I had to watch a couple of tutorial videos again as I applied the gel, but it was totally worth it. Doing gel nails at home is doable, even for a beginner like me. It’s a great way to save money and still have fabulous-looking nails. I do want to note that I realized that professional nail technicians have their tools and skills, so it won’t be a perfect replication but good enough!
I’m excited to experiment with different colors and designs in the future. Who knows, maybe I’ll even get good enough to do my friends’ nails! Anyway, I just wanted to share my little DIY gel nail journey. If you’re thinking about trying it, I say go for it! Just be prepared to make a few mistakes along the way – it’s all part of the learning process.

Alright, that’s it for now. Catch you all later!


